Showing posts with label Recipe. Show all posts

Taste of Pumpkin Pie

>> Monday, January 31, 2011

On the last day of January, I reflect fondly on the past holiday season.  Nothing beats having a slice of creamy, fresh out of the oven pumpkin pie.  It's still January, right?  The smell of cinnamon floats from the oven straight to this blog page, I just need to add some scratch and sniff capability.  This was made with Big E and C, and Big E did a wonderful job putting the whipped cream perfectly on the slice of pie.  It was delicious.  Hopefully you can enjoy this too before the winter season ends!


We used the recipe found here

Ingredients
  • 1 (15 ounce) can pumpkin
  • 1 (14 ounce) can sweetened condensed milk
  • 2 large eggs
  • 1 teaspoon ground cinnamon
  • 1/2 teaspoon ground ginger
  • 1/2 teaspoon ground nutmeg
  • 1/2 teaspoon salt
  • 1 (9 inch) unbaked pie crust

Directions
  1. Preheat oven to 425 F. 
  2. Mix pumpkin, sweetened condensed milk, eggs, spices and salt in a bowl until the mixture is smooth. 
  3. Pour into the crust and bake for 15 minutes.
  4. Reduce the oven temperature to 350 F and continue baking for 35 to 40 minutes.  The pie is ready when a knife inserted 1 inch from crust comes out clean. 
  5. Cool before serving.

Read more...

Bad A$$ Blueberry Muffins

>> Monday, September 27, 2010


Blueberry Muffins, originally uploaded by Dessert Night.

How do I capture that last taste of sweet, summer bliss? Store bought blueberries are a passable substitute for the pounds of pick your own blueberries I just enjoyed last month. This muffin batter is uncommonly thick and gooey. The batter is so thick, you have to wonder how the blueberries don't get crushed in the folding process. The result is delightful. No rock hard muffins posing as paper weights here! The first bite is that AH-HA moment you’ve been waiting for - a touch of a crunchy-cinnamon-sweet-crumble topping, followed by a burst of tart blueberries mixed with the delectable soft, moist cake. Where have you been my whole life?

The recipe has been adapted from here


Ingredients for 8 muffins

Batter
1 1/2 cups all-purpose flour
3/4 cup white sugar
1/2 teaspoon salt
2 teaspoons baking powder
1/3 cup vegetable oil
1 egg
1/3 cup milk
1 cup fresh blueberries (plus a few for munching while you wait)
1/2 cup white sugar
dash of cinnamon

Crumble Topping
3 tablespoons all-purpose flour
2 tablespoons softened butter, cubed
1 teaspoon ground cinnamon

Directions
  1. Preheat oven to 400 degrees F
  2. To make the batter, mix together flour, sugar, salt and baking powder with a dash of cinnamon. Add the vegetable oil, milk and egg to the dry ingredients and mix together. Fold in the blueberries.
  3. For the crumble, in a separate bowl, mix together sugar, flour, butter, and teaspoons cinnamon.
  4. Fill the muffin cups with the batter and top with the crumble topping.
  5. Bake for 20 to 25 minutes in the oven.

Read more...

Really-Red Red Velvet

>> Thursday, September 2, 2010


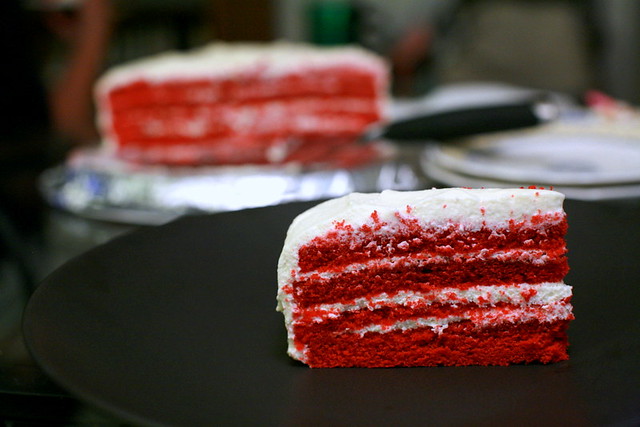
I wonder if Red Velvet wasn't red and was perhaps just velvet, would it be as popular and delicious and loved as it is?  I honestly don't understand why a red cake is so popular and loved.  I just don't see someone creating the exact same cake but with orange food coloring, calling it Orange Delight, and it being as popular as Red Velvet (although Orange Delight does sound like Chinese food because it probably IS a Chinese dish somewhere).

Anyway, it was recently Travis' (AKA Jen's husband, DN's flickr uploader and sometimes ingredient picker upper) birthday and we wanted to surprise him with a birthday cake.  Red Velvet (which I will from here on refer to as RV) seemed like a good idea because good RV is really good.
 
We did our research and picked a recipe for the cake.  We had SUCH high hopes for this cake, at least I did.  It was supposed to be better than any RV I could buy. 

I'll admit, I DID over whip the frosting just a bit.  I think next time I over whip cream (Yeah yeah, I have done it before), I am just going to keep going and make butter.  BUT still, our RV was a FAIL.  So much... unrealized potential.  The cake was off -- next time we'll double or triple the amount of cocoa powder as we couldn't taste anything cocoa in it.  The frosting was WEIRD -- the taste and texture was grainy gross.  I really recommend against using Mascarpone cheese for the frosting.  Next time we will stick to the traditional cream cheese frosting.  *Sigh*.  And worst of all?  No one wanted seconds!

While it was a fail, I will say the cake tasted better on the subsequent days.  And hey, I think it was Jen's first time cutting layers!  Anyway, Travis seemed to think it was good and I hope appreciated our efforts (he honestly thought it was good).  I feel a need for redemption, however!


The recipe we used from Joy of Baking:

Ingredients:

Red Velvet Cake:
2 1/2 cups (250 grams) sifted cake flour
1/2 teaspoon salt
2 tablespoons (15 grams) Dutch-processed cocoa powder
1/2 cup (113 grams) unsalted butter, at room temperature
1 1/2 cups (300 grams) granulated white sugar
2 large eggs
1 teaspoon pure vanilla extract
1 cup (240 ml) buttermilk
2 tablespoons liquid red food coloring
1 teaspoon white distilled vinegar
1 teaspoon baking soda
Cream Cheese Frosting:
1 1/2 (360 ml) cups heavy whipping cream
1 - 8 ounce (227 grams) cream cheese, room temperature
1 - 8 ounce (227 grams) tub of Mascarpone cheese, room temperature
3/4 teaspoon pure vanilla extract
1 cup (115 grams) confectioners' (icing or powdered) sugar, sifted

Directions:


Red Velvet Cake: Preheat oven to 350 degrees F (175 degrees C) and place rack in center of oven. Butter two - 9 inch (23 cm) round cake pans and line the bottoms of the pans with parchment paper. Set aside.
In a mixing bowl sift together the flour, salt, and cocoa powder. Set aside.
In bowl of your electric mixer, or with a hand mixer, beat the butter until soft (about 1-2 minutes). Add the sugar and beat until light and fluffy (about 2-3 minutes). Add the eggs, one at a time, beating well after each addition. Scrape down the sides of the bowl. Add the vanilla extract and beat until combined.
In a measuring cup whisk the buttermilk with the red food coloring. With the mixer on low speed, alternately add the flour mixture and buttermilk to the butter mixture, in three additions, beginning and ending with the flour.
In a small cup combine the vinegar and baking soda. Allow the mixture to fizz and then quickly fold into the cake batter. 
Working quickly, divide the batter evenly between the two prepared pans and smooth the tops with an offset spatula or the back of a spoon. Bake in the preheated oven for approximately 25 - 30 minutes, or until a toothpick inserted in the center of the cakes comes out clean. Cool the cakes in their pans on a wire rack for 10 minutes. Place a wire rack on top of the cake pan and invert, lifting off the pan. Once the cakes have completely cooled, wrap in plastic and place the cake layers in the freezer for at least an hour. (This is done to make filling and frosting the cakes easier.)
Cream Cheese Frosting: In your food processor, or with a hand mixer, process the cream cheese and mascarpone cheese until smooth. Add the vanilla and confectioners sugar and process until smooth. Transfer this mixture to a large mixing bowl.
Then, in the bowl of your electric mixer, or with a hand mixer, whip the cream until stiff peaks form. With a large spatula, gently but quickly fold a little of the whipped cream into the cream cheese mixture to lighten it. Then fold in the remaining whipped cream, in two stages. If the frosting is not thick enough to spread, cover and place in the refrigerator for an hour, or until it is firm enough to spread.
Assemble: With a serrated knife, cut each cake layer in half, horizontally. You will now have four cake layers. Place one of the cake layers, top of the cake facing down, onto your serving platter. Spread the cake layer with a layer of frosting.  Place another layer of cake on top of the frosting and continue to frost and stack the cake layers. Frost the top and sides of the cake. Can garnish the cake with sweetened or unsweetened coconut
Makes one - 9 inch (23 cm) four layer cake.


Read more: http://www.joyofbaking.com/RedVelvetCake.html#ixzz0yQkPhw3V

Read more...

Chocolate Peanut Butter Cups

>> Thursday, July 22, 2010


Chocolate Peanut Butter Cup, originally uploaded by Dessert Night.

Every Halloween as a kid, I looked forward to getting some peanut butter cups, a perfect blend of chocolate and creamy peanut butter. The gooey, sweet combination was enough to make me a happy camper. Fast forward to today. For girl’s night, I promised the host I would make something with one of my favorite ingredients, chocolate! As I looked through some recipes I wanted to try: cookies, brownies, and petit fours, I could not imagine leaving the oven on for an hour and making my kitchen as hot as the weather outside.

And then I found the perfect recipe. It’s simple, although the preparation is a bit messy, easy to serve, and since it’s homemade, there are no additional chemical additives or preservatives. For the health conscious, that makes this dessert almost guilt free! Ok, so I will admit spreading the chocolate wasn’t just a little messy, it got all over the place. At times, I felt like melted chocolate was everywhere except on the sides of paper liner. Well, at least at the end I could lick my fingers!

With this recipe, a lot of time is spent waiting for the chocolate to harden in the fridge. If you are in a hurry, the freezer will harden the chocolate faster. As expected, the end result is fabulous, tastier than the store bought version.

Our recipe is adapted from here.

Makes 12 peanut butter cups

Ingredients
  • 1 (12 ounce) package milk chocolate chips
  • 1 cup peanut butter
  • 1/2 cup powdered sugar
  • 1/4 teaspoon salt (if desired)

Directions
  1. Cut 12 paper cupcake cup liners to half of their height. Place in cupcake pan.
  2. Divide the chocolate chips in half. Using a double boiler, melt one half of the chocolate chips, stirring until smooth.
  3. Scoop about 1 heaping teaspoon of melted chocolate into each cupcake liner. Spread the chocolate evenly around the cupcake cup until evenly coated. This part will get the cupcake pan, and your fingers, messy! It helps to make the chocolate bottom thicker, and to cover the sides of the liner completely with chocolate. I used a chopstick to hold the liner in place, and a spoon to do the spreading.
  4. Cool in the refrigerator until firm (about 1 hour)
  5. In a bowl, mix the peanut butter, powdered sugar and salt.
  6. Divide the peanut butter mixture into the chocolate cups. Melt the remaining chocolate, and spoon over peanut butter. Spread chocolate to the edges of the cups. Cool in the refrigerator until firm (about 1 hour)
  7. Enjoy!

Read more...

Souffle Goes Green - No Waste

>> Tuesday, June 8, 2010


Cheese Souffle, originally uploaded by Dessert Night.
After we made the Tiramisu, I was left with 6 perfectly good egg whites, and no idea of what to do with them. While some sites pointed out that eggs are an inexpensive ingredient; ever since I was a child, wasting food was a no-no, so I couldn't throw them out! We also had more than enough Tiramisu to last a week, so making Chocolate Souffle again was really not an option.

I could have frozen the egg whites, but decided to whip up something savory and delicious: Cheese Souffle. This is off topic, but it turned out so well that I imagine it is the perfect complement to your dessert.  The recipe below was adapted from here.

Cheese souffle with Egg Whites

Ingredients
Grated Parmesan cheese and butter for prepping souffle dish

2.5 TB butter
3 TB flour
3/4 c. simmering light cream
1/2 tsp. salt
1/8 tsp. pepper
Big pinch nutmeg

6-7 egg white
Big pinch salt
3/4 c. (3 oz.) coarsely grated Swiss cheese, + 1 Tablespoon for topping the souffle
3/4 c. (3 oz.) Swiss cheese cut into 1/4 inch cubes


Directions
  1. Preheat the oven to 400F. 
  2. Generously butter 6-cup souffle dish and coat evenly with grated Parmesan cheese. 
  3. In a saucepan over low-med heat, melt butter and then stir in flour. Cook for about 2 min. making sure it doesn't brown. Off heat, add simmering cream and seasonings. Bring to boil and stir for 1 min. Take off heat.
  4. Beat egg whites and salt until stiff peaks form. Stir one fourth into cream base. Stir in the grated cheese. Then add diced cheese. Gently fold in remaining whites.
  5. Pour mixture into prepared souffle dish, sprinkle w/ remaining grated cheese. Set in middle of oven and immediately reduce heat to 375F. Bake for 25-30 min. til souffle has puffed and browned. 
  6. Serve Immediately.

Read more...

Hotteok (호떡) - A Delectable Korean Treat!

>> Friday, June 4, 2010


Hotteok, originally uploaded by Dessert Night.


Hotteok (호떡) is one of those treats you buy from the street vendors (포장마차) in Korea that you not only never regret getting, but wish the street vendors would come to America to sell them as well.  It's basically a pancake filled with brown sugar, cinnamon, and nuts if desired. It's cooked so that the brown sugar oooooooozes out of the pancake, and it's just... so good.  Hotteok memories are happy memories. :)  I remember eating hotteok in Surak San (one of the mountains in Korea): it was big, thin, crisp, oozy, and... just make sure you pick up some when you go to Korea. 

I've made it a couple times.  There are mixes you can buy from the grocery store that have the dough mix and filling mix for you.  Tried it, didn't like it.  I also tried it from a recipe online.  One of the difficulties with making hotteok is that the dough is EXTREMELY sticky.  Then you have to put oil all over your hands so it doesn't stick to your hands... but that got old really quick.  I also found that they were really doughy, and not as thin as I'd like.  After doing some research, it was apparent I needed to try adding some rice flour as it would help with the thickness and the texture.  So then I stumbled upon a recipe from I love butter and sugar that I thought turned out really well.

Here is our adapted recipe:

Pancake:

* 3 teaspoons lukewarm water
* 1/4 teaspoon white sugar
* 1/4 teaspoon dry-active yeast
* 6 tablespoons milk (7 if it's too dry)
* 3/4 cup all-purpose flour
* 1/2 cup sweet rice flour (We used a Japanese brand found at the local asian grocery store)
* Pinch of salt
* Canola oil

Filling:

* Scant 1/4 cup brown sugar
* 2-3 tablespoons peanuts, toasted and finely chopped
* 1/4 teaspoon ground cinnamon


To give it a go:

1.  Combine water, sugar, and yeast in a medium sized bowl.  Then turn on the oven light and let it sit for 10 minutes inside your oven.  The heat from the light will get the yeast to bubble. 
2. Add in milk, all-purpose flour, glutinous rice flour, and salt, then mix until it's all incorporated.
3. Cover bowl with cloth (or plastic wrap or a paper towel, but trying to be green here), put it back in the oven with the oven light on, and let it rise for 3 hours. (Tip: If you really can't wait to eat your hotteok, we did do it for an hour and half, it was fine.)
4. After the dough has doubled in size, knead the dough for a minute.  Also mix the filling together in a separate bowl.
5. Put some canola oil to coat the bottom of your pan, and set the heat to medium to medium.
6. Portion out the dough into golf-sized balls. (Tip: If the dough is VERY sticky, put some oil onto your hands for the remainder of the recipe.  This helps a LOT, although I found I didn't need to do that with this particular recipe)
7. For each ball of dough, flatten it in your hand and lay a generous spoonful of the filling.  Then gather the dough around the filling so as to encase the filling with the dough.
8. Place a ball with the gathered side down onto the pan.  Let it sit for 10 seconds.  Then flatten with a spatula (Tip: Again, if the dough is very sticky, make sure your spatula is oiled).  Flatten it several times, switching your angle.  The thickness should be about or smaller than the thickness of a pancake.  Fill your pan this way with 2 or 3 pancakes at a time.
9.  Once a golden brown is reached, flip the hotteok over.  Cook both sides to a golden brown.
10. Eat!  But be careful, the inside will be very hot!

Jen and I made this for our end of the year Korean project, and it turned out to be a hit!  I give ourselves an A+.

If you try out the recipe, be sure to leave a comment to let us know how it went! It also lets us know we have readers!

Hello?

Read more...

Farmer's Market Finds - Rhubarb

>> Sunday, May 23, 2010

Last week, I was at the farmer's market and picked up a bundle of fresh rhubarb stalks.  This was my first time buying rhubarb, and I admired the lovely, deep red color of the stalks.  Except for the color, Rhubarb stalks look a lot like celery.  Be careful though, the rhubarb leaves are toxic and should NOT be eaten.  I tried a bite of fresh stalk, and it was sour!

In bakeries and markets, I've seen rhubarb pies, or strawberry rhubarb pies, so I knew this rhubarb had a lot of potential.  Maria found this simple recipe which used a few ingredients that we had at home, so I was able to turn my rhubarb into a delectable crumble.  This rhubrb crumble has a tangy flavor that mixes perfectly with the sweet, crumble topping to create a melange of flavors on the tongue.  Here is our adaptation of the recipe.

Rhubarb Crumble

Rhubarb Crumble

Filling

  • 3/4 lb rhubarb, cut into 1-inch pieces
  • 1/2 cups white sugar
  • 2 tablespoons all purpose flour
  • 1/2 teaspoon vanilla extract
  • Pinch of nutmeg (the original recipe used cardamon)
Crumble
  • 1/2 cup all purpose flour
  • 1/4 teaspoon salt
  • 1/2 cup light brown sugar
  • 4 tablespoons of butter, softened to room temperature.  Cut into cubes.
  1. Preheat the oven to 375 degrees
  2. In a bowl, mix the rhubarb, sugar, flour, vanilla and nutmeg.  Put this mixture into a 5 by 7 baking dish.  In my dish, the rhubarb mixture was about 1 inch thick.
  3. In another bowl, mix the flour, salt, brown sugar.  Mix in the butter until the mixture is crumbly.  
  4. Spread the crumble mixture in the baking dish
  5. Bake for 35 to 45 minutes, until the top is brown and the filling looks bubbly.
Let cool, and enjoy!

Read more...

Tiramisu - Two nights are Better Than One!

>> Thursday, May 13, 2010

One of my favorite desserts is the Tiramisu.  The luscious combination of flavor and texture results in a taste of absolute perfection.  The thought of the light, creamy, and fluffy marscapone, slightly bitter coffee, and soft cake mingled with a touch of chocolate is enough to make my day! 

From our research, we definitely wanted a recipe that involved making our own lady fingers - partly for freshness and to preserve the do-it-all spirit of DN (Dessert Night)!  In addition, we wanted to put our own twist on this adventure, by making the Tiramisu into individual cupcakes which would be perfect for sharing with friends.  Finally, we wanted to preserve the Tiramisu layers that we really felt were the heart of the dessert.  Many of the cupcake recipes involved making a cake bottom, and used the marscapone cheese only in the frosting.  While these sounded yummy, Maria and I knew that layers were a definite must!

And so a plan evolved:

DN 1:  Make lady fingers, but instead of piping the fingers individually, make a sheet, and use two sizes of circle cutters to cut circles for the cake layers
DN 2:  Whip the marscapone filling, and layer with the lady finger circles into the cupcake tin.  Refrigerate and Enjoy!

Read more...

Souffle of Choice

>> Wednesday, May 12, 2010

Before we move on to our next dessert adventure, I wanted to post some notes about how we chose the "perfect" chocolate souffle!  We compared several chocolate souffle recipes and selected this one because it served several people, and had very clear, detailed instructions.  For the chocolate, we skipped some messy chopping and used bittersweet chocolate chips.  In addition, we read that a copper bowl is ideal for beating egg whites perfectly.  Since neither of us has a copper bowl, we were very careful to separate the egg yolks from the whites, leaving no trace of shells or yolk in the egg whites.  (To our chagrin, a copper bowl is quite a bit pricier than the stainless steel version.)  While the recipe makes six souffles, we ended up having to butter up some extra ramekins at the last minute - perhaps due to extreme luck in beating the egg whites?  Here is the recipe adapted from the Food Network, with some notes:

Chocolate Souffle Recipe

Ingredients

  • 7 ounces finely chopped bittersweet or semisweet chocolate
  • 4 tablespoons unsalted butter, plus for preparing the molds
  • 1 1/2 teaspoons pure vanilla extract
  • 3 large egg yolks
  • 3 tablespoons warm water
  • 1/2 cup sugar, plus 2 tablespoons
  • 8 large egg whites, room temperature
  • 1/2 teaspoon fresh lemon juice
  • Confectioners' sugar for garnish

Directions
  1. Brush 6 (6-ounce) ramekins with soft butter, then coat with sugar. Put the prepared ramekins in the freezer.
    Note:
    We used the fridge, since the freezer was full!
  2. Preheat to 400 degrees F.
  3. Put the chocolate and butter in a medium heatproof bowl. Bring a saucepan filled with an inch or so of water to a very slow simmer; set the bowl over, but not touching, the water. Stir the chocolate occasionally until melted and smooth. Remove from heat and stir in vanilla extract. Set aside.
    Note: This is similar to using a double boiler to melt the chocolate and the butter.  Once the chocolate is smooth, take the bowl off the heat and stir in the vanilla. 
  4. Combine the egg yolks and warm water in the bowl of a standing mixer or large bowl and beat until frothy. Gradually add 2 tablespoons sugar, and continue beating until ribbons form, about 5 minutes. Very lightly fold the yolks into the chocolate mixture.
    Note: In the ribbon stage, the egg yolks turned a pale yellow.
  5. Put the egg whites in the bowl of a standing mixer, or large non-reactive bowl, add the lemon juice. Beat on medium until frothy; then gradually add the remaining 1/2 cup of sugar and increase speed to high. Beat until the whites hold a stiff but not dry peak.
    Note: If you don't have a rubber spatula, I definitely recommend using one to clean the sides of the bowl when beating!
  6. Working quickly, fold about a third of the egg whites into the chocolate to lighten; then fold in remaining whites until blended. Gently ladle or spoon the souffle mixture into the ramekins, and place on a baking sheet. (Level off the surface with a straight edge, scraping any excess mixture back into the bowl.)
  7. Immediately bake until the souffle rises about 1 1/2 inches from the ramekins, and the tops are touched with brown, about 18 to 20 minutes. Remove from oven, dust with confectioners' sugar and serve immediately.
Delicious!

Read more...

  © Blogger template Simple n' Sweet by Ourblogtemplates.com 2009

Back to TOP