 |
| Volcano cake without dry ice |
Last week was my boyfriend's nephews 5th birthday, and my boyfriend's sister, Lindsay, asked me to help her with the cake. They were going for a dinosaur theme and wanted to do a volcano for the cake. Sounded like a lot of fun, and it's Lindsay, so of course I was going to help. It didn't sound like it'd be too difficult, and Lindsay did a LOT of research (so much so that she didn't know what to do anymore!). Well, we did a trial run, and I think that really SAVED us. And now I can share with you what we did and learned to get the perfect volcano cake for your next party. And, I must say, we played around a LOT with the dry ice with our trial run because dry ice is REALLY COOL. We played around with it so much, we had to buy more the next day for the actual birthday (well that and it evaporated too much). Seriously, every cake could have dry ice incorporated into it.
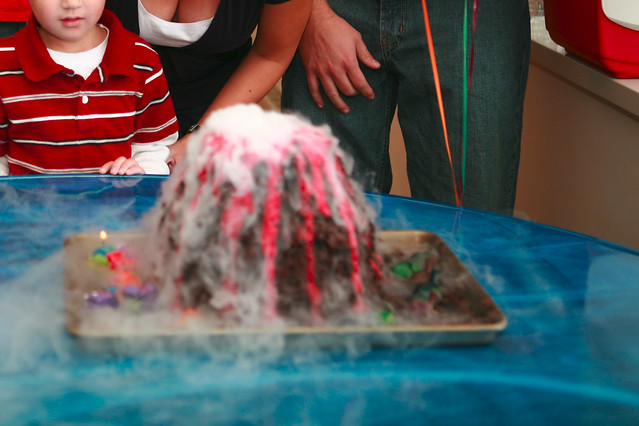 |
| With the dry ice. Unfortunately I don't have a sharp photo with the dry ice because I was capturing the faces. But you get the idea! |
As far as the ingredients, we used all store bought stuff - cake mixes, frosting. Maybe I would've tried to find a recipe to make from scratch, but I had no time, and honestly, this made it much easier, especially since we essentially made it twice. But anyway, here it goes!
Cake
3 boxes of cake mix (we did 2 chocolate, and 1 yellow cake, but you could do all yellow. I would have at least one chocolate cake for the top though. I will explain this later)
1 8-inch circle pan (This is the top layer. Use chocolate cake for this)
1 bundt pan (Middle layer, we used yellow cake)
1 9-inch circle pan (bottom layer)
1 cyndrical container for the lava/steam (we used a glass cup. this is best if the sides are straight)
1 metal cookie sheet (or anything else sturdy that will fit the cake)
Icing
3 containers of ready to use icing in chocolate
1 container of white icing
Red gel food coloring (the one used for cakes. This is important as it'll get you a nice intense red color)
Red sugar sprinkles (I like the added texture, but this is optional)
Chocolate sprinkles for dirt (also optional)
Directions
- Bake cakes according to directions. Let cool in pan to room temperature.
- Level cakes that are the bottom or middle layer. If the top layer cake is domed, that's ok b/c it' looks more like a mountain. Save any chocolate cake pieces. Eat all yellow cake pieces. (I ate a lot while making these cakes!)
- Using cylindrical container as a guide or to cut, cut hole in each layer in the center. I inverted the cup and just pressed it into the cake to make my hole. Worked like a charm. (I eyeballed the center, and this can be fixed in the next step if you don't like the hole)
- Stack cakes onto cookie sheet lining up the holes - bottom, middle bundt, top dome up. You could ice in between, but we didn't. After lining up the holes, if they don't look centered, center the cakes as you like, and slide the cup down the hole again. It should shave off the cake and be better.
- Take a serrated knife and start cutting the cake so it looks like a mountain. Most of the part I cut was the top layer at an angle. Again, save all chocolate pieces.
- Place cup into hole. You want the top of the cup to be flush with the top of the volcano. This will ensure that the steam from the dry ice flows evenly across the volcano. In our trial run, we had a ridged hole, and the steam would go to the lowest point and not go across the whole volcano. We used oreo cookies in the bottom of the hole to get the proper height. If your cup is too tall for the cake, use a smaller cup. :)
- Start icing the mountain with the chocolate icing. You didn't have to do a crumb layer, but I was being careful, especially when I was icing the yellow cake layer. But it's ok to have crumbs because it'll just look like dirt on the mountain! We will cover it up anyway.
- Ice around the mountain onto the cookie sheet for the ground. Doesn't have to be the whole cookie sheet, but we just used any remaining chocolate icing.
- Now for all those chocolate cake pieces you've been saving. Crumble them up in a bowl. Doesn't have to be all, and you can crumble them as you need more. Sprinkle the crumbs on the ground frosting. If your volcano is pretty vertical, you'll need to take a handful of crumbs and run your hand along the volcano. I took a handful, started at the base, and ran my hand upwards. You have to do this gently, else you'll get frosting all over your hand. It's really running your hand across the volcano, not so much pressing the crumbs in. And it doesn't have to be 100% covered, but do it to your liking. You can also use the chocolate sprinkles now too.
- Now for the lava! You can make a few different colors, but we just went with red. I didn't measure any of this, but it's flexible. Take about 3/4 of a cup of the white frosting and add about a teaspoon of the red food gel. I added probably about a teaspoon of milk because in the trial run, it cooled/dried up really quickly. Mix it up, and place it in the microwave until it's melted (we did 20 seconds on high). If it's not RED, then add more of the red food gel until it's the color you like. If it's cooled during this time, stick it in the microwave again (do like 5 seconds at a time).
- Using a spoon, dribble the lava from the top of the volcano and let it fall down the volcano naturally. Dribble it from the top so that you also cover the edge of the cup. Let some drip into the cup. After this, you can place any plastic dinosaurs if you're going for a dinosaur theme around the cake. Otherwise, you're done until show time!
- Show time! We learned the hard way that you should light candles that are on the tray after you show off the volcano/steam part. This is because the candles will be blown out by a lot of steam coming off of the dry ice. So HOLD OFF on candles until after show time! Now you're ready for the dry ice. Drop some dry ice into the cup. Take some hot water and put it in. You should experiment with this at home because it's just really cool. And if you put too much water, you'll just soak your cake. But the cool part is, if you put enough water so that it's close to the rim, you'll see RED LAVA, because of the red icing you put into the cup earlier. But you'll see the Red lava when you cut into the cake, so that's still cool. See below for photo!
- Cut and eat cake!
 |
| Don't the layers look nice! And we weren't expecting the lava look in the center, so that was a great surprise! |
As far as the dry ice, where to get it. You really should just call your local grocery/liquor store and ask around. That's how Lindsay found it, and I think they found this Robert's Oxygen place that sold it, and also a local wine/beer place that had it. But to get it to steam, just add hot water to it, and it starts steaming and bubbling. We were advised not to touch the dry ice with out any protection (we just scooped it with a spoon), as apparently, you can get frostbite from touching dry ice. In any case, it was super cool to see. I suggested maybe next year we could do a Batman themed party and make a cave with the steam coming out! :) But we shall see about that.
Anyway, if you have any questions, feel free to leave a comment! Also, if you make one, upload a photo of your volcano blog to our new flickr group!
http://www.flickr.com/groups/dessertnight/
Cheers!


