Farmer's Market Finds - Rhubarb

>> Sunday, May 23, 2010

Last week, I was at the farmer's market and picked up a bundle of fresh rhubarb stalks.  This was my first time buying rhubarb, and I admired the lovely, deep red color of the stalks.  Except for the color, Rhubarb stalks look a lot like celery.  Be careful though, the rhubarb leaves are toxic and should NOT be eaten.  I tried a bite of fresh stalk, and it was sour!

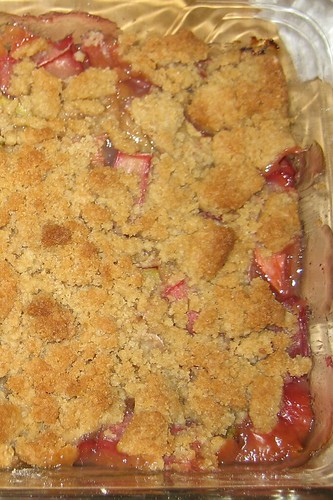
In bakeries and markets, I've seen rhubarb pies, or strawberry rhubarb pies, so I knew this rhubarb had a lot of potential.  Maria found this simple recipe which used a few ingredients that we had at home, so I was able to turn my rhubarb into a delectable crumble.  This rhubrb crumble has a tangy flavor that mixes perfectly with the sweet, crumble topping to create a melange of flavors on the tongue.  Here is our adaptation of the recipe.

Rhubarb Crumble

Rhubarb Crumble

Filling

  • 3/4 lb rhubarb, cut into 1-inch pieces
  • 1/2 cups white sugar
  • 2 tablespoons all purpose flour
  • 1/2 teaspoon vanilla extract
  • Pinch of nutmeg (the original recipe used cardamon)
Crumble
  • 1/2 cup all purpose flour
  • 1/4 teaspoon salt
  • 1/2 cup light brown sugar
  • 4 tablespoons of butter, softened to room temperature.  Cut into cubes.
  1. Preheat the oven to 375 degrees
  2. In a bowl, mix the rhubarb, sugar, flour, vanilla and nutmeg.  Put this mixture into a 5 by 7 baking dish.  In my dish, the rhubarb mixture was about 1 inch thick.
  3. In another bowl, mix the flour, salt, brown sugar.  Mix in the butter until the mixture is crumbly.  
  4. Spread the crumble mixture in the baking dish
  5. Bake for 35 to 45 minutes, until the top is brown and the filling looks bubbly.
Let cool, and enjoy!

Read more...

Be Not Afraid... of Ginger... Ale!

>> Wednesday, May 19, 2010

Ginger is one of those ingredients that I find intimidating. It's spicy kick and strong flavor is one to know and to respect. While I can't say I've done a lot of cooking with ginger (and hey, I guess I don't need to since this is a dessert blog and not a cooking blog), I can say that homemade ginger ale tops any ginger ale that you can buy. And I mean it. AND it's so simple, you should definitely give it a go.

All you do is make a simple syrup (equal parts water and sugar), add some slices of ginger, and let it simmer for at least 30 minutes (longer if you'd like) to let the ginger infuse the syrup. Then add some cold sparking water with ice and mix to taste, and tell me that's not good! For those of you that really must have a recipe to follow here:

1 cup sugar
1 cup water
1 piece of ginger (about the size of your thumb) sliced up

1. Put sugar and water over med-low heat to melt sugar.
2. Add pieces of ginger and bring to a simmer.
3. Simmer for 30+ min.
4. Mix with sparking water and ice.
5. Enjoy!

Tip on peeling ginger: use a spoon! If the ginger is good, the skin should come off easily using a spoon to scrape at it. Have fun!

Read more...

Tiramisu - Two nights are Better Than One!

>> Thursday, May 13, 2010

One of my favorite desserts is the Tiramisu.  The luscious combination of flavor and texture results in a taste of absolute perfection.  The thought of the light, creamy, and fluffy marscapone, slightly bitter coffee, and soft cake mingled with a touch of chocolate is enough to make my day! 

From our research, we definitely wanted a recipe that involved making our own lady fingers - partly for freshness and to preserve the do-it-all spirit of DN (Dessert Night)!  In addition, we wanted to put our own twist on this adventure, by making the Tiramisu into individual cupcakes which would be perfect for sharing with friends.  Finally, we wanted to preserve the Tiramisu layers that we really felt were the heart of the dessert.  Many of the cupcake recipes involved making a cake bottom, and used the marscapone cheese only in the frosting.  While these sounded yummy, Maria and I knew that layers were a definite must!

And so a plan evolved:

DN 1:  Make lady fingers, but instead of piping the fingers individually, make a sheet, and use two sizes of circle cutters to cut circles for the cake layers
DN 2:  Whip the marscapone filling, and layer with the lady finger circles into the cupcake tin.  Refrigerate and Enjoy!

Read more...

Souffle of Choice

>> Wednesday, May 12, 2010

Before we move on to our next dessert adventure, I wanted to post some notes about how we chose the "perfect" chocolate souffle!  We compared several chocolate souffle recipes and selected this one because it served several people, and had very clear, detailed instructions.  For the chocolate, we skipped some messy chopping and used bittersweet chocolate chips.  In addition, we read that a copper bowl is ideal for beating egg whites perfectly.  Since neither of us has a copper bowl, we were very careful to separate the egg yolks from the whites, leaving no trace of shells or yolk in the egg whites.  (To our chagrin, a copper bowl is quite a bit pricier than the stainless steel version.)  While the recipe makes six souffles, we ended up having to butter up some extra ramekins at the last minute - perhaps due to extreme luck in beating the egg whites?  Here is the recipe adapted from the Food Network, with some notes:

Chocolate Souffle Recipe

Ingredients

  • 7 ounces finely chopped bittersweet or semisweet chocolate
  • 4 tablespoons unsalted butter, plus for preparing the molds
  • 1 1/2 teaspoons pure vanilla extract
  • 3 large egg yolks
  • 3 tablespoons warm water
  • 1/2 cup sugar, plus 2 tablespoons
  • 8 large egg whites, room temperature
  • 1/2 teaspoon fresh lemon juice
  • Confectioners' sugar for garnish

Directions
  1. Brush 6 (6-ounce) ramekins with soft butter, then coat with sugar. Put the prepared ramekins in the freezer.
    Note:
    We used the fridge, since the freezer was full!
  2. Preheat to 400 degrees F.
  3. Put the chocolate and butter in a medium heatproof bowl. Bring a saucepan filled with an inch or so of water to a very slow simmer; set the bowl over, but not touching, the water. Stir the chocolate occasionally until melted and smooth. Remove from heat and stir in vanilla extract. Set aside.
    Note: This is similar to using a double boiler to melt the chocolate and the butter.  Once the chocolate is smooth, take the bowl off the heat and stir in the vanilla. 
  4. Combine the egg yolks and warm water in the bowl of a standing mixer or large bowl and beat until frothy. Gradually add 2 tablespoons sugar, and continue beating until ribbons form, about 5 minutes. Very lightly fold the yolks into the chocolate mixture.
    Note: In the ribbon stage, the egg yolks turned a pale yellow.
  5. Put the egg whites in the bowl of a standing mixer, or large non-reactive bowl, add the lemon juice. Beat on medium until frothy; then gradually add the remaining 1/2 cup of sugar and increase speed to high. Beat until the whites hold a stiff but not dry peak.
    Note: If you don't have a rubber spatula, I definitely recommend using one to clean the sides of the bowl when beating!
  6. Working quickly, fold about a third of the egg whites into the chocolate to lighten; then fold in remaining whites until blended. Gently ladle or spoon the souffle mixture into the ramekins, and place on a baking sheet. (Level off the surface with a straight edge, scraping any excess mixture back into the bowl.)
  7. Immediately bake until the souffle rises about 1 1/2 inches from the ramekins, and the tops are touched with brown, about 18 to 20 minutes. Remove from oven, dust with confectioners' sugar and serve immediately.
Delicious!

Read more...

First Impressions

>> Tuesday, May 4, 2010

On Sunday, we stopped by Baked and Wired, a cupcake place in Georgetown.  They have some incredibly delicious cupcakes, and the first thing that I noticed about their cupcakes, was the beautiful parchment paper liner. This simple, elegant touch made my cupcake look and feel special.

Luckily, you can recreate this fabulous look at home:
Parchment paper cupcake liners
Martha Stewart's version

  1. Cut a 5 inch square piece of parchment paper
  2. Spray cooking spray into the muffin tin
  3. Use a cup to press the parchment paper into the hole of the muffin tin.  You may need to twist a few times to define the creases
  4. Fill the liners with batter and bake!
We're excited to try this method for the next DN!

Read more...

  © Blogger template Simple n' Sweet by Ourblogtemplates.com 2009

Back to TOP