I wonder if Red Velvet wasn't red and was perhaps just velvet, would it be as popular and delicious and loved as it is? I honestly don't understand why a red cake is so popular and loved. I just don't see someone creating the exact same cake but with orange food coloring, calling it Orange Delight, and it being as popular as Red Velvet (although Orange Delight does sound like Chinese food because it probably IS a Chinese dish somewhere).
Anyway, it was recently Travis' (AKA Jen's husband, DN's flickr uploader and sometimes ingredient picker upper) birthday and we wanted to surprise him with a birthday cake. Red Velvet (which I will from here on refer to as RV) seemed like a good idea because good RV is really good.
We did our research and picked a
recipe for the cake
. We had SUCH high hopes for this cake, at least I did. It was supposed to be better than any RV I could buy.
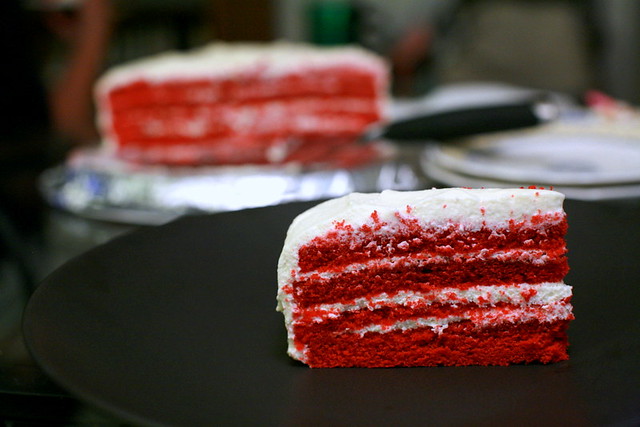
I'll admit, I DID over whip the frosting just a bit. I think next time I over whip cream (Yeah yeah, I have done it before), I am just going to keep going and make butter. BUT still, our RV was a FAIL. So much... unrealized potential. The cake was off -- next time we'll double or triple the amount of cocoa powder as we couldn't taste anything cocoa in it. The frosting was WEIRD -- the taste and texture was grainy gross. I really recommend against using Mascarpone cheese for the frosting. Next time we will stick to the traditional cream cheese frosting. *Sigh*. And worst of all? No one wanted seconds!
While it was a fail, I will say the cake tasted better on the subsequent days. And hey, I think it was Jen's first time cutting layers! Anyway, Travis seemed to think it was good and I hope appreciated our efforts (he honestly thought it was good). I feel a need for redemption, however!
The recipe we used from Joy of Baking:
Ingredients:
Red Velvet Cake:
2 1/2 cups (250 grams) sifted cake flour 1/2 teaspoon salt
2 tablespoons (15 grams) Dutch-processed cocoa powder
1/2 cup (113 grams) unsalted butter, at room temperature 1 1/2 cups (300 grams) granulated white sugar 1 cup (240 ml) buttermilk
2 tablespoons liquid red food coloring
1 teaspoon baking soda
Cream Cheese Frosting:
1 1/2 (360 ml) cups heavy whipping cream
1 - 8 ounce (227 grams) cream cheese, room temperature
1 - 8 ounce (227 grams) tub of Mascarpone cheese, room temperature
3/4 teaspoon pure vanilla extract
1 cup (115 grams) confectioners' (icing or powdered) sugar, sifted
Directions:
Red Velvet Cake: Preheat oven to 350 degrees F (175 degrees C) and place rack in center of oven. Butter two - 9 inch (23 cm) round cake pans and line the bottoms of the pans with parchment paper. Set aside.
In a mixing bowl sift together the flour, salt, and cocoa powder. Set aside.
In bowl of your electric mixer, or with a hand mixer, beat the butter until soft (about 1-2 minutes). Add the sugar and beat until light and fluffy (about 2-3 minutes). Add the eggs, one at a time, beating well after each addition. Scrape down the sides of the bowl. Add the vanilla extract and beat until combined. In a measuring cup whisk the buttermilk with the red food coloring. With the mixer on low speed, alternately add the flour mixture and buttermilk to the butter mixture, in three additions, beginning and ending with the flour. In a small cup combine the vinegar and baking soda. Allow the mixture to fizz and then quickly fold into the cake batter.
Working quickly, divide the batter evenly between the two prepared pans and smooth the tops with an offset spatula or the back of a spoon. Bake in the preheated oven for approximately 25 - 30 minutes, or until a toothpick inserted in the center of the cakes comes out clean. Cool the cakes in their pans on a wire rack for 10 minutes. Place a wire rack on top of the cake pan and invert, lifting off the pan. Once the cakes have completely cooled, wrap in plastic and place the cake layers in the freezer for at least an hour. (This is done to make filling and frosting the cakes easier.)
Cream Cheese Frosting: In your food processor, or with a hand mixer, process the cream cheese and mascarpone cheese until smooth. Add the vanilla and confectioners sugar and process until smooth. Transfer this mixture to a large mixing bowl. Then, in the bowl of your electric mixer, or with a hand mixer, whip the cream until stiff peaks form. With a large spatula, gently but quickly fold a little of the whipped cream into the cream cheese mixture to lighten it. Then fold in the remaining whipped cream, in two stages. If the frosting is not thick enough to spread, cover and place in the refrigerator for an hour, or until it is firm enough to spread.
Assemble: With a serrated knife, cut each cake layer in half, horizontally. You will now have four cake layers. Place one of the cake layers, top of the cake facing down, onto your serving platter. Spread the cake layer with a layer of frosting. Place another layer of cake on top of the frosting and continue to frost and stack the cake layers. Frost the top and sides of the cake. Can garnish the cake with sweetened or unsweetened coconut Makes one - 9 inch (23 cm) four layer cake.
Read more:
http://www.joyofbaking.com/RedVelvetCake.html#ixzz0yQkPhw3V